

“The best gifts are store bought!” – said no Mom, ever! When it comes to gifts, the human connection and personalization that paper and packaging goods create makes them the perfect medium for homemade gifts that touch the heart.
Last year, consumers spent more than $23 billion on Mother’s Day gifts. This year will be no different, but why not skip the malls and use your hands and imaginations to create something special that mom will love AND use!
We cooked up some gift ideas you can create with items already found in your home – like milk cartons, toilet paper rolls, cardboard chip containers – showing us, that wherever you are, paper and packaging are the foundation for some of the best gifts mom will cherish.
George Oliphant, host of the home improvement show “George to the Rescue,” is no stranger to working with his hands. In anticipation of Mother’s Day, he joined us in creating some fun and creative Mother’s Day gifts using paper and packaging materials that are sure to make mom smile. Take a peek below and have fun making memories with the family for mom!
Watch Oliphant's on-air demonstration.
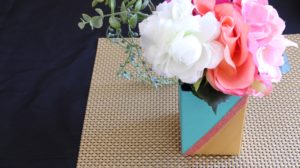
DIY Milk Carton Vase
Materials
- 1 empty one-liter milk carton
- Ruler
- Pen or Marker
- Scissors or Box Cutter
- Two Different Color Paints
- Paint Brush
- Painter’s Tape
- Glitter Decorative Tape
- Glass Floral Beads
- Flowers
Instructions
- Measure and draw a line all the way around all four sides of the milk carton, approximately 4.5” from the bottom of the carton.
- Cut all four sides of the milk carton along the line with a pair of scissors or a box cutter and remove the top of the milk carton.
- Divide each side of the milk carton into two triangles . Place painter’s tape on a diagonal to create the shapes.
- Then apply one color of paint to the bottom triangles. Apply multiple coats, allowing time to dry between each coat.
- Once the paint is completely dry, remove the painter’s tape.
- Align painter’s tape along the edge of all the painted triangles. (It’s important to make sure the paint is completely dried before this step)
- Paint the remainder of the milk carton the other color. Apply multiple coats, allowing time to dry between each coat.
- Once the paint is completely dried, remove the painter’s tape to reveal a beautiful two-toned design.
- Now apply decorative tape diagonally where the two colors of the triangles meet. Trim excess tape along edges.
- Then fill the vase with water or glass floral beads and mom’s favorite flowers!
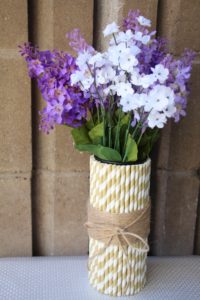
Pringles Can Vase
Materials
- 1 Empty Chip Can
- Paper Straws
- Twine
- Glue Gun & Glue Sticks
- Black Paint
- Paint Brush
- Flowers
Instructions
- Wipe out the inside of the chip can to make sure it is clean.
- Paint the exterior of the empty chip can with black paint. Let dry.
- Align and glue paper straws vertically onto the can with a glue gun.
- Wrap twine around the center of the can to create a 2.25” band.
- Tie center with a bow.
- Display Mom’s favorite flowers!
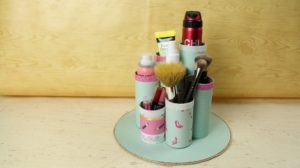
Makeup/Makeup Brush Organizer
Materials
- 4 Toilet Paper Rolls
- 2 Paper Towel Rolls
- Scrapbook Paper (at least 8.5” x 8.5”)
- Cardboard (at least 8.5” x 8.5”)
- Adhesive (glue stick or double sided tape)
- Glitter Decorative Tape
- 8” Plate, Compass, or Circular Object
- Pencil or Pen
- Ruler
- Scissors or X-acto knife
- Glue Gun & Glue Sticks
- Twine
- Makeup Supplies
Instructions
- Cut and arrange 7-8 toilet paper and paper towel rolls at various heights.
- Measure and cut scrapbook paper to size so that it wraps around each of the the paper rolls (recommended length is 6”).
- Adhere scrapbook paper to paper rolls with a glue stick or double-sided tape.
- Decorate the top of each roll with glitter decorative tape.
- Trace and cut two circles (with an 8” plate, compass, or circular object) onto both the cardboard and 8.5” x 8.5” scrapbook paper).
- Adhere the 8” circle scrapbook paper onto the 8” circle cardboard using the glue gun or tape.
- Arrange and glue paper rolls vertically onto the base with a glue gun.
- Glue twine to the circumference of the base.
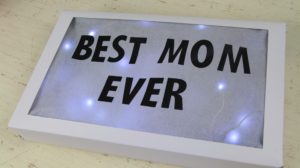
DIY Lightbox
Materials
- White T-shirt Gift Box
- X-Acto Knife
- Cutting Mat
- Ruler
- Pen or Pencil
- Scissors
- Wax Paper
- Vinyl Letter Stickers
- Duct Tape
- Clear Tape
- Battery Powered LED String Lights
- Batteries to Power Lights
Instructions
- Measure and draw a rectangular frame on one side of the gift box. Make sure to leave a least an inch around the edges of the frame.
- Cut frame with X-Acto knife and ruler on cutting mat.
- Cut wax paper to the same size as the gift box (larger than the opening of the frame).
- Arrange and adhere vinyl letter stickers with message “BEST MOM EVER” on the wax paper.
- Tape the four sides of the wax paper inside the box with duct tape with the letters facing out.
- Tape battery powered LED string lights inside the box with clear tape.
- Close and tape the box shut with clear tape.
- Turn on your light box and spread the message: “BEST MOM EVER.”


